Step-by-step instructions for at-home HIV testing.
Instructions are based on the official bioLytical Instructions for Use
(IFU 51-1241E). Always read the printed IFU that comes with your kit
before testing.
Most people who use this page will not test positive for HIV. This
page guides you through the testing process so you can do it
correctly the first time. The INSTI HIV Self Test produces a result
in about 60 seconds once the testing process is complete.
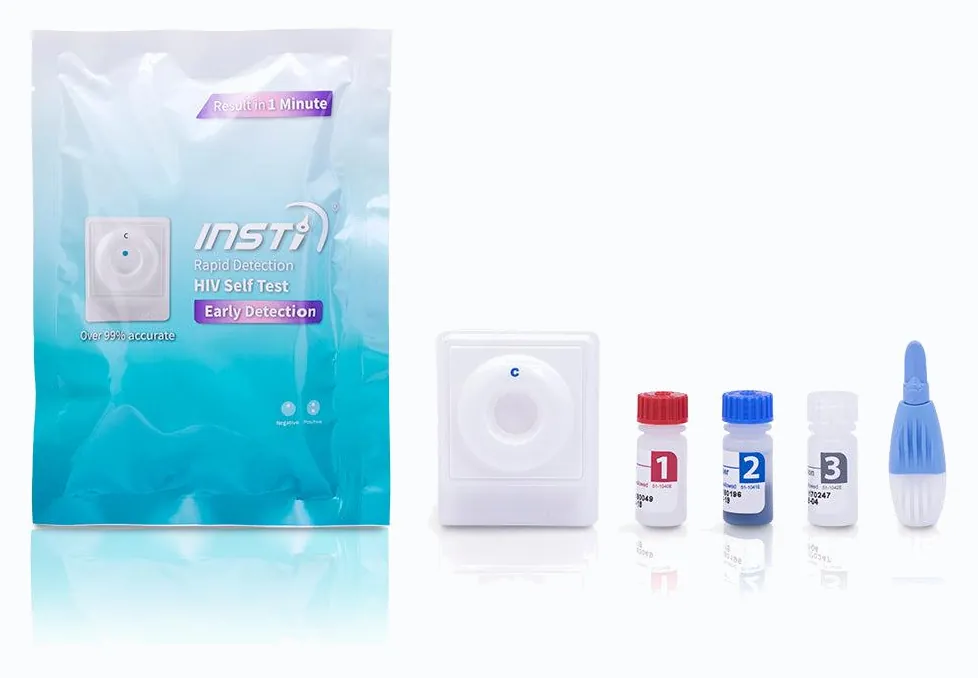
Before you start, lay everything out on a clean, flat surface. Your
INSTI HIV Self Test kit contains:
Test device — packaged inside a foil pouch labelled
"Membrane Unit". The white plastic square with a circular well in
the centre, marked with "C" above the well.
Bottle 1 (red cap) — Sample Diluent. A colourless
solution that dilutes the blood sample.
Bottle 2 (blue cap) — Color Developer. A blue
solution that detects human antibodies.
Bottle 3 (grey cap) — Clarifying Solution. A
colourless solution that removes background colour for easier
reading.
Sterile single-use lancet — for collecting your
blood drop.
Instructions for Use (IFU) — the printed leaflet
inside the box. Read it before testing.
Who should not use this test
The INSTI HIV Self Test is designed for self-testing by adults at
home. It is not suitable for everyone. Per the bioLytical Instructions
for Use, the test should not be used by:
Anyone under 18 years of age
Anyone afraid of needles or with belonephobia
Anyone with a bleeding disorder
Anyone currently taking antiretroviral treatment (ART) — including
PrEP — as the test may give a false negative result
Anyone who has participated in an HIV vaccine study
Anyone who may have been infected within the last 3 months (window
period — see
Window period guidance →
)
If any of these apply to you, please consult a healthcare provider for
laboratory-based HIV testing instead.
The IFU also notes that severe blood disorders such as multiple
myeloma may produce false negative or invalid results, and that
elevated haemoglobin levels may produce false negative results in
rare cases.
Before you begin
Wash your hands
Use warm water — it helps blood flow. Make sure your hands are clean AND completely dry before testing. Damp fingers can affect the test.
Clear a clean space
Place all kit items on a clean, flat surface with good lighting. You'll need both hands free during the test, so have your bandage within reach.
Read the IFU first
The full Instructions for Use is in your kit. Read it once before starting. This page is a visual companion, not a replacement.
The full process takes about 5–10 minutes from start to result
Do not pause halfway — the test must be completed
in the proper sequence without delays between steps
Test should be performed at room temperature (15–30°C)
Adequate lighting is required to read the result clearly
The 3 main steps
The INSTI HIV Self Test takes you through three phases: collecting
your blood sample, running the test, and reading the result. Each
phase has a few sub-steps.
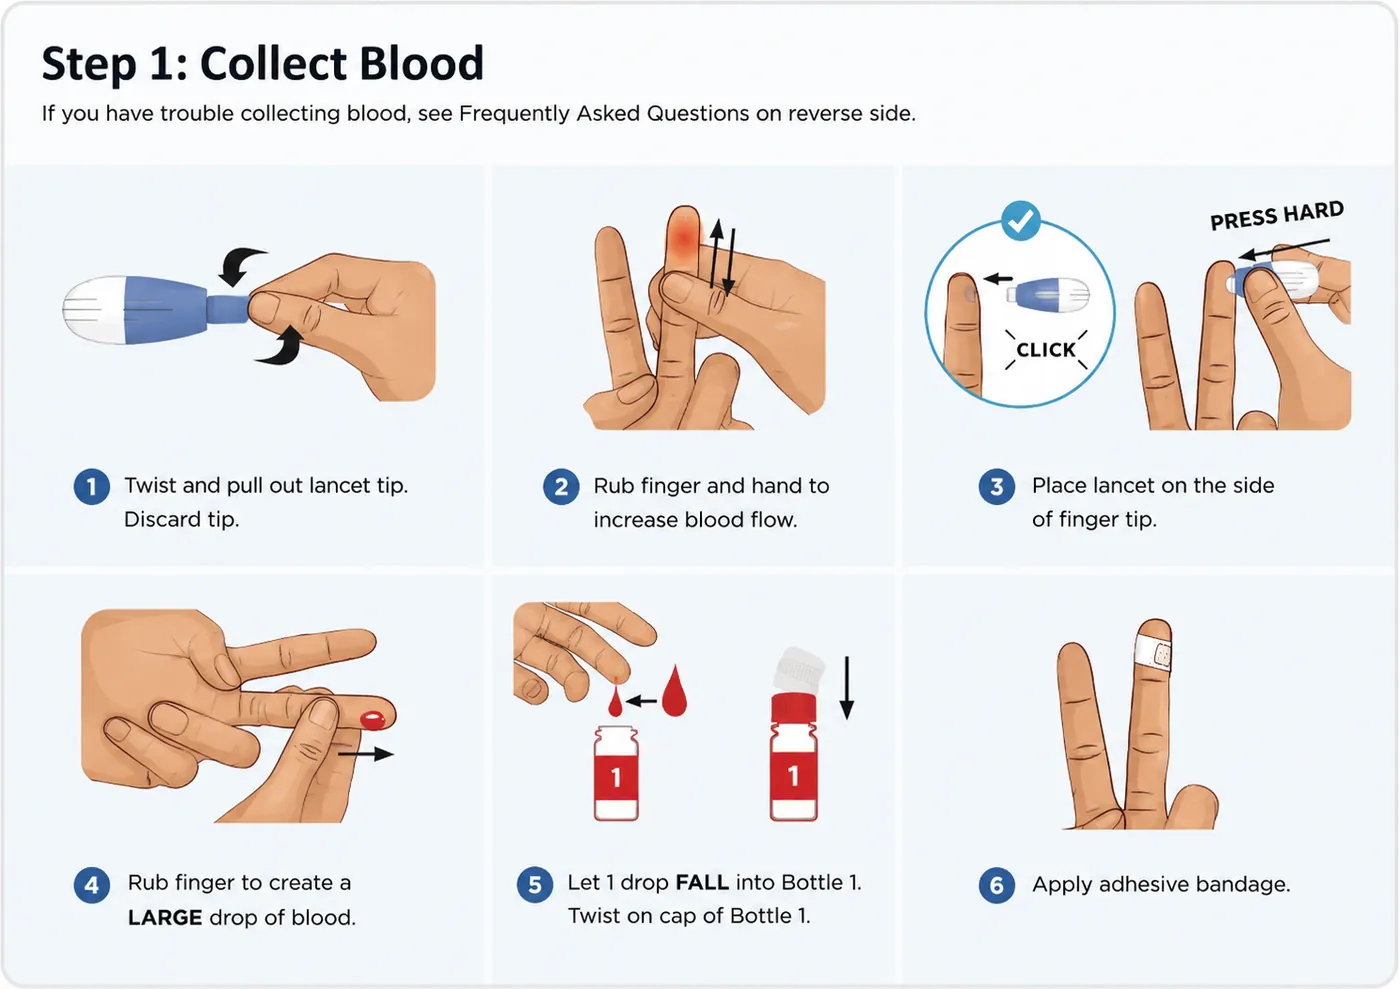
1
Phase 1: Collect your blood sample
Estimated time: ~1 minute
Preparation
Open the test device pouch (labelled "Membrane
Unit") and place the test device on a flat surface.
Remove the cap of Bottle 1 (red cap) and set the
bottle upright on your flat surface. Don't tip it over — it
contains liquid.
Collecting the blood drop
Twist and pull out the lancet tip. Discard the
tip — the lancet is now ready to use.
Rub your finger and hand to increase blood flow.
The IFU recommends warming your hands and even drinking some water
20 minutes before to help.
Place the lancet on the side of your fingertip (not the pad — the side bleeds better and is less calloused).
Press hard until you hear or feel a click. The
lancet retracts automatically after activation.
Rub your finger to create a LARGE drop of blood.
You need about a 50µL drop — a full hanging drop, not a smear.
Let one drop FALL into Bottle 1 — don't touch the
bottle with your finger. The drop should fall directly into the
liquid.
Twist on the cap of Bottle 1 firmly.
Apply the adhesive bandage to your finger.
You only need one drop. The rest of the test does not require any
more blood.
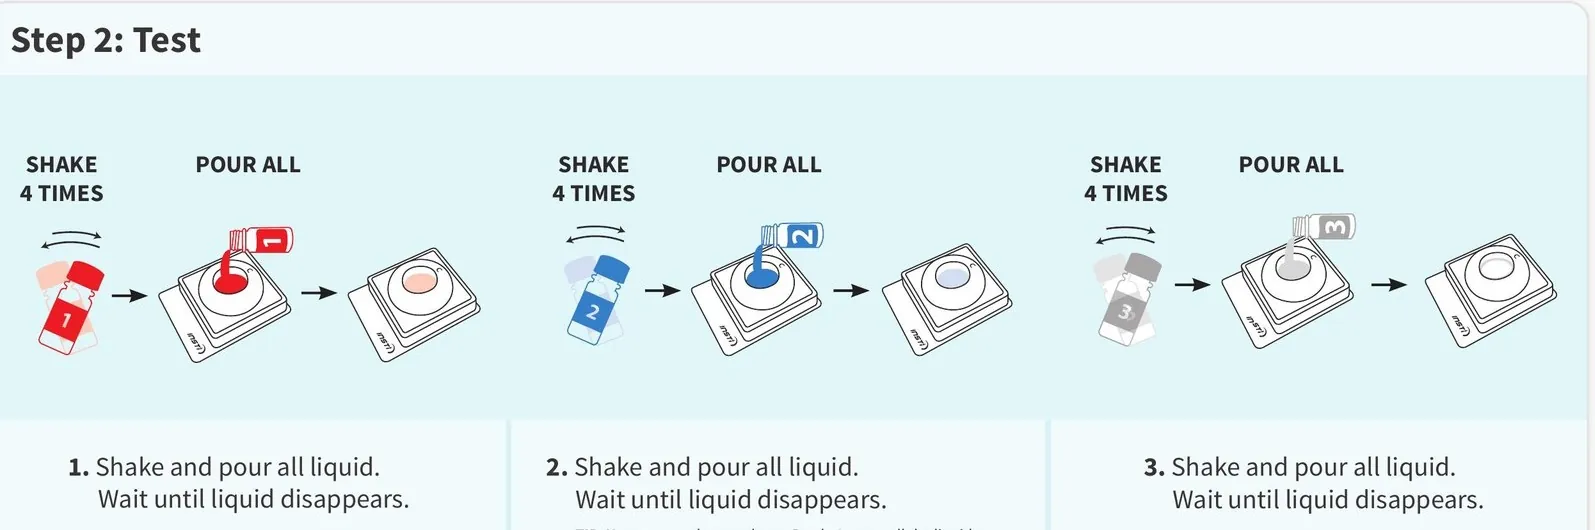
2
Phase 2: Run the test
Estimated time: ~1–2 minutes
Each bottle: SHAKE 4 TIMES, then POUR ALL.
Pick up Bottle 1 (red cap), shake it 4 times, then pour all of
the liquid into the centre of the test device.
Wait for the liquid to fully drain from the test window.
Pick up Bottle 2 (blue cap), shake it 4 times, then pour all of
it into the test device.
Tip: you may need to gently tap Bottle 2 to get all the
liquid out. Wait again for the liquid to disappear.
Pick up Bottle 3 (grey cap), shake it 4 times, then pour all
of it into the test device.
Wait again for the liquid to disappear.
The test is now running. Move on to reading your result.
If you spill some liquid outside the test device while pouring,
keep going with the test. As long as the control dot appears
clearly after Bottle 3, your result is valid.
3
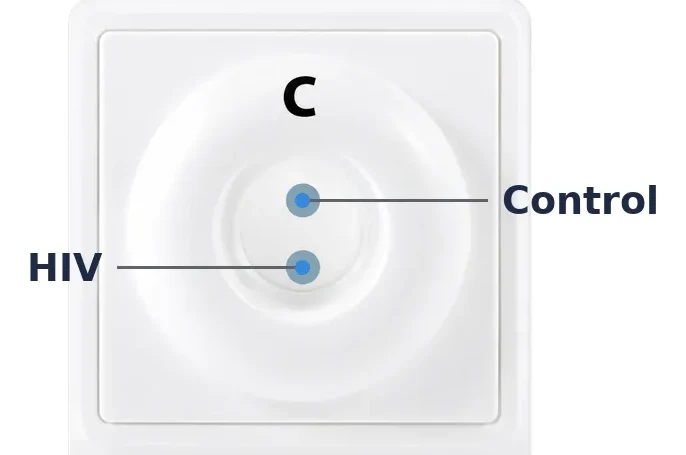
Phase 3: Read your result
Read immediately, within 1 hour
Important rules
Wait for all liquid to disappear from the test
window before reading.
Read the result right away. Do not interpret the
result more than 1 hour after completing the test procedure.
Use good lighting. Faint dots may be hard to see
in dim light.
The Anchor Rule: the test is only valid if a
control dot appears at the top (above "C"). Without a control dot,
the test is invalid — even if a test dot is visible below.
What does your result look like?
Your test will show one of three possible patterns. Below is what
each means.
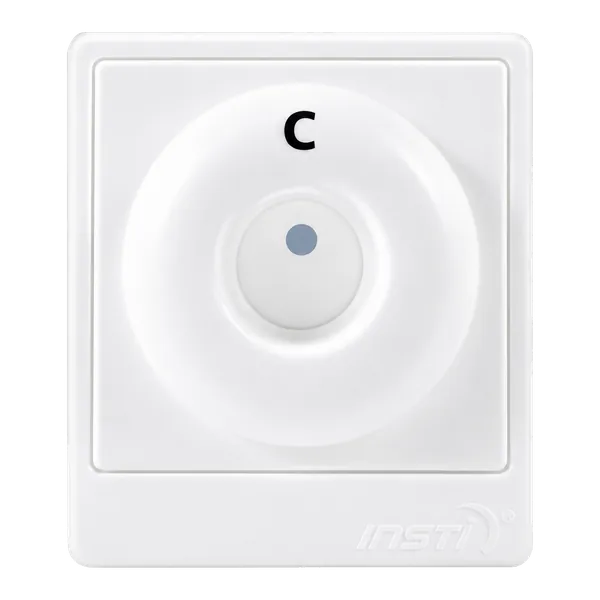
NON-REACTIVE
Non-reactive — likely no HIV detected
Only the top control dot is visible. No HIV antibodies were detected at the time of testing.
Next steps
If your possible exposure was within the past 3 months, retest after 3 months have passed since exposure
Otherwise, no further action needed
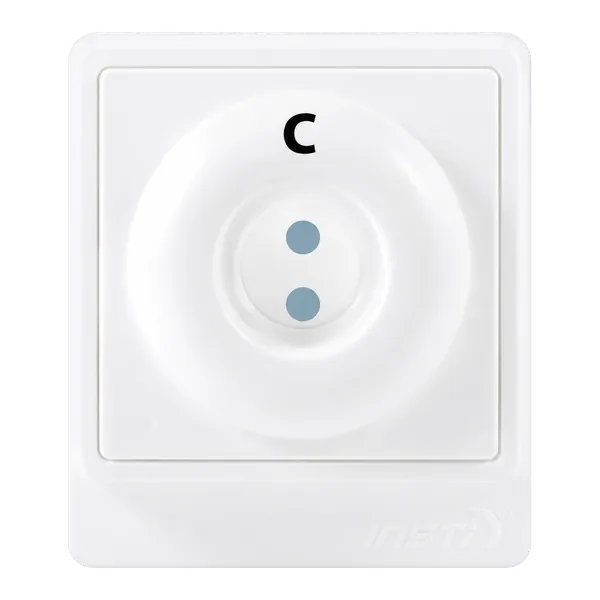
REACTIVE
Reactive — preliminary positive
Two dots are visible — the top control dot AND a bottom test dot. This is preliminary, not a diagnosis. Must be confirmed by laboratory testing through a healthcare provider.
Next steps
Contact a sexual health clinic or your GP for confirmatory laboratory testing
Don't use another self-test to confirm — laboratory testing is required
Modern HIV treatment is highly effective when started early
INVALID
Invalid — test could not be read
No control dot appeared. The test did not work correctly and the result cannot be interpreted.
Next steps
Repeat the test with a new kit, following the instructions carefully
If your kit arrived damaged, contact customer@one-self.nl for assistance
For more detail, including what to do after a reactive result and
partner-testing guidance:
See full result guidance →
Common mistakes
A few errors come up often. Avoiding them helps the test work
correctly the first time.
Adding bottles too quickly. Each bottle's liquid
must fully disappear from the test window before you add the next
one.
Not shaking the bottles. Each bottle must be
shaken 4 times before pouring. Don't skip this.
Wrong bottle order. The order is always: Bottle 1
(red) → Bottle 2 (blue) → Bottle 3 (grey). Mixing the order will
give an invalid or unreliable result.
Not enough blood. You need a full hanging drop
(about 50µL). If Bottle 1 doesn't change colour after the blood
drop, you may not have collected enough.
Touching the membrane in the centre well of the
test device — this can interfere with the result.
Reading the result too late. Read immediately once
the liquid has disappeared. Do not interpret a result more than 1
hour after completing the test procedure.
Reading without enough light. Faint dots are easy
to miss in dim light. Use a well-lit room.
Pausing during the test. The test procedure must
be completed without long delays between steps.
This page is a visual companion to the printed Instructions for
Use that comes with your INSTI HIV Self Test. Always follow the
printed IFU. If you have questions about the test or your result,
contact a healthcare provider or sexual health clinic.
Step illustrations on this page are from the bioLytical INSTI HIV
Self Test Instructions for Use (IFU 51-1241E, 19-Mar-2026), used
with attribution.
If your possible exposure happened within the last 72 hours, do
not delay — seek urgent medical advice regarding PEP from a sexual
health clinic, emergency department, or HIV support service.
This page was last updated: May 2026. For our editorial process, see
editorial standards.
Twój wybór plików cookie
Używamy plików cookie do analiz i reklam, aby mierzyć i ulepszać tę witrynę. Ty decydujesz. Prywatność